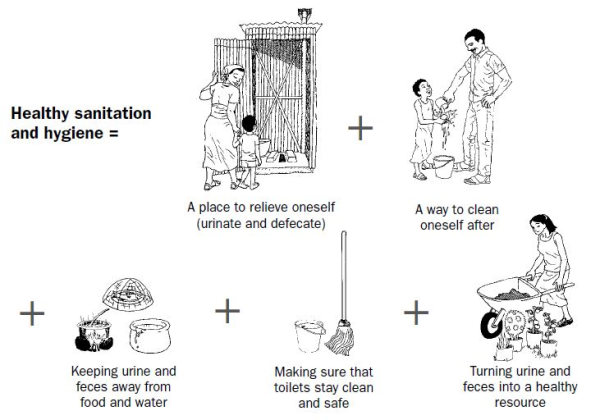
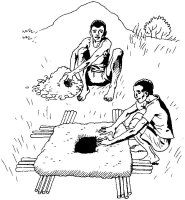
What people want from toilets
Health is not always the main reason why people want to have clean toilets, better water supplies, or improved hygiene. Other needs may include:
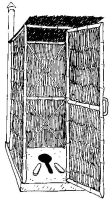
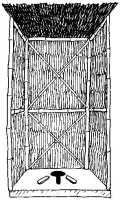
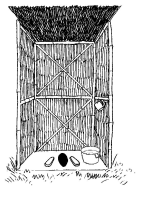
- Privacy: A toilet can be as simple as a deep hole in the ground. But the need for privacy makes it important for a toilet to have a good shelter. Making a door or enclosed entrance to a toilet, or building it away from where people usually walk, will make it nicer to use. The best shelters are simple and are built from local materials.
- Safety: If a toilet is badly built it can be dangerous to use. And if it is far from the home, women may be in danger of sexual violence when they take care of their sanitation needs. For a toilet to be safe it must be well-built and in a safe place.
- Comfort: People will more likely use a toilet with a comfortable place to sit or squat, and a shelter large enough to stand up and move around in. They will also be more likely to use a toilet that is close to the house and that gives protection from wind, rain, or snow.
- Cleanliness: If a toilet is dirty and smelly, no one will want to use it - and it may spread disease. Sharing the task of cleaning or paying for cleaning with money or other benefits will help to ensure that toilets are kept clean.
- Respect: A well-kept toilet brings status and respect to its owner. Often this is a very important reason for people to spend the money and effort to build one. Safe water for washing and drinking is also important for health. So are other kinds of cleanliness such as ensuring that women have a way to keep clean during monthly bleeding.
 |
| What people want from toilets |
|
© The Hesparian Sanitation
|
Toilet choices
Below we describe several kinds of toilets that can be built using local resources. No one toilet design is right for every community or household, so it is important to understand the benefits of each choice.
Note: These drawings show toilets with no doors so you can see inside them.
|
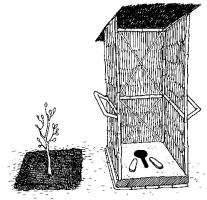
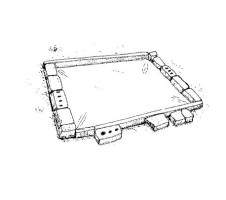
Simple compost toilet for tree planting
A shallow pit, a platform, and a movable shelter.Best in places where people wish to plant trees and can manage a movable toilet.
|
 |
| Simple compost toilet for tree planting |
|
© The Hesparian Sanitation
|
|
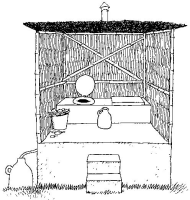
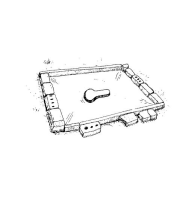
Urine-diverting dry toilet
An above-ground structure with two chambers, a toilet bowl that separates urine and feces, and a pipe that diverts urine. Best in places where people will use treated human waste as fertilizer, and where the ground water is high or there is risk of flooding.
|
 |
| Urine-diverting dry toilet |
|
© The Hesparian Sanitation
|
|
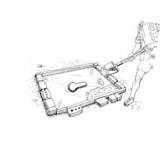
2 pit compost toilet
2 shallow pits, a platform, and a light, movable shelter or a permanent shelter big enough for both pits. Best in places where people will use treated human waste as fertilizer.
|
 |
| 2 pit compost toilet |
|
© The Hesparian Sanitation
|
|
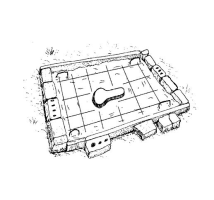
Pour-flush toilet
A water-seal trap, a platform, 1 or 2 deep pits, and a shelter. Best in places with deep groundwater and where people use water for anal washing after using the toilet.
|
 |
| Pour-flush toilet |
|
© The Hesparian Sanitation
|
|
Ventilated improved pit toilet
A deep pit, a concrete or wood and earth platform, a shelter, and a vent pipe to trap flies. Best in places with deep groundwater and no risk of flooding.
|
 |
| Ventilated improved pit toilet |
|
© The Hesparian Sanitation
|
|
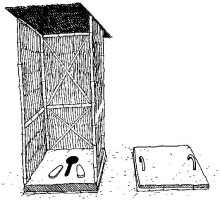
Closed pit toilet
A deep pit, a platform, and a shelter. Best in places with deep groundwater and no risk of flooding.
|
 |
| Closed pit toilet |
|
© The Hesparian Sanitation
|
Where to build a toilet
When deciding where to build a toilet, make sure you will not pollute wells or groundwater. The risk of groundwater pollution depends on local conditions such as the type of soil, the amount of moisture in the area, and the depth of the groundwater. But some general rules can ensure safety under most conditions.
The bottom of the pit (if it is a pit toilet) or the chamber (if it is a compost toilet) should be at least 2 ½ meters above the groundwater. If you dig a pit for a toilet and the soil is very wet, or if the pit fills with water, this is a bad place to put a toilet. Keep in mind that water levels are much higher in the wet season than in the dry season. Do not build pit toilets on ground that gets flooded. When there is a risk of groundwater pollution from pit toilets, consider building an above-ground toilet, such as the dry toilet.
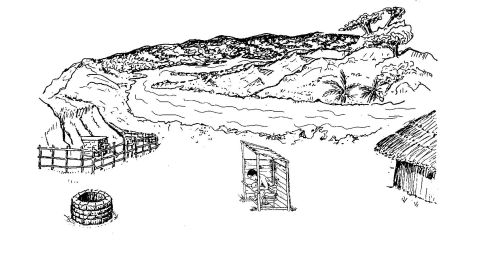 |
| A toilet should be at least 20 meters from rivers, lakes, springs, streams and wells. |
|
© The Hesparian Sanitation
|
Groundwater flows downhill. So, if there is no choice but to build a toilet in a place where there is a risk of groundwater pollution, place the toilet downhill from nearby wells.
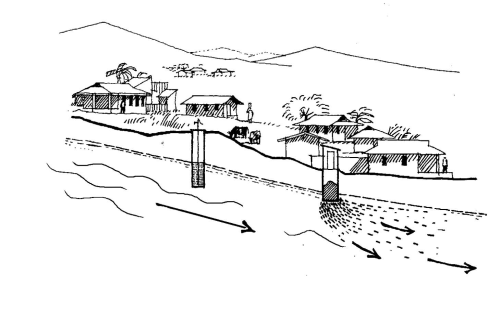 |
| Wells should be uphill from pit toilets because groundwater flows downhill. |
|
© The Hesparian Sanitation
|
How to make a concrete toilet platform
A well-made concrete platform will last many years. One 50 kilo bag of cement is enough to make 4 platforms or 2 platforms and 2 ring beams. You will also need reinforcing wires, bricks, and boards to form the mold, and a piece of wood cut to the shape of a keyhole to mold the hole. This platform is square, but you could make a round one.
 |
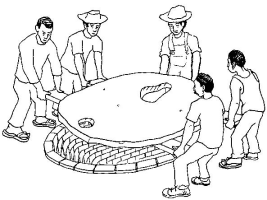
1. Lay down a plastic sheet or used cement bags on flat ground. On top of this, make a mold of bricks or boards about 120 centimeters long, 90 centimeters wide and 6 centimeters deep. |
| Mold of bricks |
|
| © The Hesparian Sanitation |
|
 |
2. Place a wooden "keyhole" mold in the center, to shape the toilet hole. You can also use bricks to block out the hole, and shape the hole after the concrete is poured. |
| Key hole mould |
|
| © The Hesparian Sanitation |
|
 |
3.Make a concrete mix of 1 part cement, 2 parts gravel, 3 parts sand, and water. Pour the concrete into the mold until it is half-way to the top. |
| Concrete mix |
|
| © The Hesparian Sanitation |
|
 |
4.Place reinforcing wires 3 millimeters thick on top of the wet concrete. Use 4 to 6 wires going in each direction. Make handles of wire 8 to 10 millimeters thick, and set them in the concrete near the corners.
|
| Reinforcing wires |
|
| © The Hesparian Sanitation |
|
 |
5.Pour the rest of the concrete, and level it with a block of wood. |
| Pour concrete and level it |
|
| © The Hesparian Sanitation |
|
6. Remove the keyhole mold when the concrete begins to harden (after about 3 hours). If you used a brick mold, remove the bricks and form the hole into a keyhole shape. Leave the slab overnight and cover it with wet cement sacks, damp cloth or a plastic sheet. Wet it several times a day to keep it damp for 7 days. Keeping it wet lets the concrete dry slowly so that it hardens well and becomes strong.
7. When the concrete is completely hardened, place the platform over the pit. To make the pit more secure, also use a concrete ring beam.
8. Make a cover for the hole out of concrete or wood. It can have a handle, or can be made to be moved by a person's foot, to avoid getting germs on the hands.
Platform improvements
Because germs and worms can collect near the hole, foot rests to stand on will reduce the risk of health problems. If people prefer to sit, make a round hole and a concrete seat. To make a mold, use 2 buckets of different sizes, one inside the other. There must be several inches of space between sides of the inner bucket and the outer bucket. Weight the inner bucket with rocks so it stays on the bottom, and pour concrete into the space between buckets. To make a dry toilet, you can use this platform with a urine-separating toilet bowl
 |
| Platform improvemet |
|
© The Hesparian Sanitation
|
Closed pit toilets
A closed pit toilet has a platform with a hole in it and a lid to cover the hole when it is not in use. The platform can be made of wood, concrete, or logs covered with earth. Concrete platforms keep water out and last many years. A closed pit toilet should also have a lining or concrete ring beam to prevent the platform or the pit itself from collapsing.
The ventilated improved pit toilet uses a vent pipe to reduce smells and flies.
A problem with pit toilets is that once the pit is full, the toilet can no longer be used. One way to take advantage of the waste in full pits is to plant a tree on the site. To do this, remove the platform, ring beam, and shelter, and cover the waste with 30 centimeters (2 hands-widths) of soil mixed with dry plant matter. Allow several months for the waste to settle, fill it with more soil, and plant a tree.
Another option is to add soil frequently while in use and let it sit for 2 years to allow the waste to decompose. Then dig it out, use the waste as fertilizer, and use the pit again.
|
| Closed pit toilet |
|
© The Hesparian Sanitation
|
To make a closed pit toilet
1. Dig a hole less than 1 meter across and at least 2 meters deep.
2. Line the top of the pit with stones, brick, concrete or other material that will support a platform and prevent the pit from collapsing. A concrete ring beam works well.
3. Make a platform and a shelter to put over the pit. A concrete platform works best, but local materials like logs or bamboo and mud can work too. If you make a platform from logs, use wood that is termite-proof and does not rot easily.
 |
| Lining top of the pit with stone |
|
© The Hesparian Sanitation
|
 |
| Making a platform and a shelter to put over the pit |
|
© The Hesparian Sanitation
|
 |
| Lining pit with grass |
|
© The Hesparian Sanitation
|
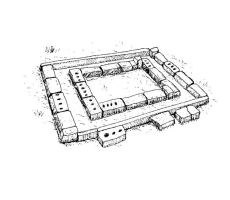
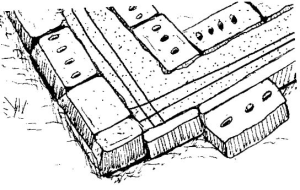
How to make a concrete ring beam
A ring beam is a square piece of cast concrete with an open center. It is set into the top of a toilet pit to support the platform and shelter, and to keep the pit walls from collapsing. The ring beam described here can be used along with the platform described below for all pit toilets. Adjust the size of the ring beam to fit the width of the pit.
1. Lay down a plastic sheet or cement bags on level ground.
 |
| Concrete ring beam |
|
© The Hesparian Sanitation
|
 |
2. Make a mold of bricks, wooden boards, or both. For a platform that is 120 centimeters by 90 centimeters, the ring beam will be 130 centimeters by 1 meter on the outside, and 1 meter by 70 centimeters on the inside. |
| Add concrete |
|
|
© The Hesparian Sanitation
|
|
 |
3. Make a concrete mix of 1 part cement, 2 parts gravel, 3 parts sand, and water. Pour the concrete into the mold until it is half-way to the top. |
| Make concrete mix |
|
|
© The Hesparian Sanitation
|
|
 |
4. Place 2 pieces of reinforcing wire 3 millimeters thick on top of the wet concrete on each side of the ring beam. If you want, you can make handles of wire 8 to 10 millimeters thick, and set them in the concrete near the corners. |
| Reinforced wire |
|
|
© The Hesparian Sanitation
|
|
|

|
5. Pour the rest of the concrete, and level it with a block of wood. |
| Pour the rest of the concrete |
|
|
© The Hesparian Sanitation
|
|
6. Cover the concrete with wet cement sacks, wet cloth, or a plastic sheet and leave it overnight. Wet it several times a day to keep it damp for 7 days.
7.When the ring beam is solid, carry it to the site of the toilet. Level the ground, place the ring beam, and dig a pit inside of it. Pack soil around the outside of the ring beam to set it in place.
8. Place the toilet platform on top, then build a shelter.
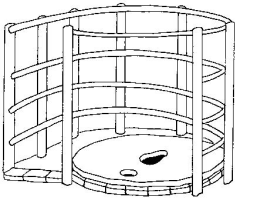
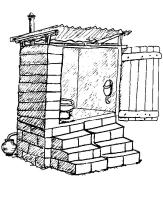
Ventilated improved pit toilets (VIP)
The VIP toilet is a kind of closed pit toilet that reduces smells and flies.
How the VIP works
Wind blows across the top of the vent pipe and carries away smells. The shelter keeps the toilet dark so the flies in the pit will go towards the light at the top of the pipe, get trapped by the wire screen, and die.
To make the VIP toilet
1. Dig the pit 2 meters deep and 1 ½ meters wide. Line the top with bricks or a concrete ring beam sized to fit the pit (see chapter above). If the shelter will be very heavy (made of brick, concrete or heavy wood), line the whole pit, except the bottom. Leave gaps in the brick work to let liquids out.
2. Make a platform. See the guidelines on page 30, but make the platform a little bigger: 1 ½ meters by 1 meter, with 2 holes in it. The second hole, about 15 centimeters wide near an edge of the platform, is for the vent pipe.
3. Build a shelter over the pit and platform.
4. Fit a vent pipe at least 15 centimeters wide over the smaller hole. Paint the vent black to absorb heat and improve ventilation. Cover the top of the vent pipe with a mosquito screen (aluminum or stainless steel last longest) and a "hat" to protect from rain. Make the vent pipe rise at least 50 centimeters above the roof so the wind can draw out odors.
To use and maintain a VIP toilet
Keep the hole covered when not in use. Keep the shelter semi-dark inside. Keep the toilet clean and wash the platform often.
VIP toilets can have these problems
If the shelter is not dark enough, or if the hole is left uncovered, flies will not enter the pipe. The vent pipe may get blocked by spider webs. If the shelter has no roof, or if the screen breaks or comes off the vent pipe, there is little fly control.
 |
| Covering hole of VIP toilet |
|
© The Hesparian Sanitation
|
 |
| Structure around VIP toilet |
|
© The Hesparian Sanitation
|
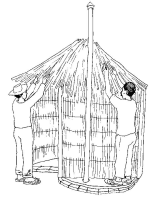 |
| Making roof and wall of VIP toilet |
|
© The Hesparian Sanitation
|
Ecological toilets
Ecological toilets turn feces and urine into soil conditioner and fertilizer. This improves people's health and the environment by preventing germs from spreading and turning harmful human waste into something useful.
Ecological toilets are safer for groundwater than other toilets because they sit above ground or use shallow pits. They produce fertilizer and they can be used for many years. These toilets need more maintenance than pit toilets (but not pour-flush toilets), so it is important that people understand how they work.
Turning waste into fertilizer
Rich, healthy soil needs organic matter - what is left when plants and other living things die and decompose. This natural process of organic matter breaking down into soil is sometimes called composting.
Around the world, farmers compost their wastes and add them into the soil. This keeps the soil full of nutrients for growing crops. Just as people need nutrients from food to grow strong and healthy, plants need nutrients in soil to grow strong and bear fruit.
 |
| Ecological sanitation turns waste into a resource |
|
© The Hesparian Sanitation
|
- The soil grows crops
- Crops become food
- Food becomes human waste
- Human waste can be turned into fertilizer
- Fertilizer feeds the soil
Germs and nutrients
Both urine and feces carry nutrients that can improve soil. But feces can also have many germs that cause disease. For this reason, making fertilizer from feces takes more care than composting animal manure and food scraps. Feces should never be used raw. But once they are made into fertilizer, it can safely help to grow food, trees, and other crops without chemical fertilizers. Urine carries far fewer germs than feces and has more nutrients. This makes it safer to handle and very valuable as fertilizer. But because it does carry some germs and is too strong to use directly on plants, it also needs special handling.
Compost toilets and urine-diverting dry toilets
There are 2 main types of ecological toilets: "compost toilets" and "urine-diverting" or "dry" toilets. Both kinds can create safe fertilizer. Many people call both kinds "compost toilets". But there are some important differences.
|
In compost toilets:
- Feces and urine go into a container that will not leak into the groundwater, like a shallow pit or a large concrete box.
- The user adds a mix of dry matter such as straw, leaves, sawdust, and soil after each use. This reduces smells and helps the waste to break down.
- Excrement is stored until it heats up and breaks down. The mix will heat up and kill most germs, including roundworm eggs (the hardest to kill). To heat up well, it must be slightly damp.
- After the mix has had a long time to kill germs (usually 1 year), it is removed for use as fertilizer.
- To be safe, it is best to mix it into a compost pile, where it will break down more. Then it can be mixed into the soil for planting.
|
|
In dry toilets:
- Urine is kept separate from feces. It is collected, processed, and used as fertilizer.
- Feces goes into a container, like a large concrete box or a hard plastic movable container that will not leak into groundwater.
- The user adds soil mixed with dry plant matter and ash to the feces after each use. This reduces smells and helps the waste to dry out.
- The feces never get mixed with water. A dry mix will kill most germs, including roundworm eggs.
- The feces is stored for up to 1 year, until it has the texture of dry soil.
- Then it can be mixed into a compost pile, emptied into a shallow pit for planting a tree, or added directly into the soil for planting
|
Ecological toilets use local materials and labor in Central Mexico
In several towns in Morelos, Mexico, many people use ecological dry toilets. One neighborhood called La Cienega, or The Swamp, has a special need for dry toilets. Because the neighborhood is in a wet, lowland area, pit toilets do not work. To solve the problem, members of the community bought a special kind of toilet bowl that separates urine from feces. These toilet bowls are built locally in small workshops that support several workers. The workers train community groups how to use these new toilet bowls.
Many people in La Cienega make a living by growing and selling fruit trees and other plants. The first people in the neighborhood to use dry toilets discovered that they could use the urine and compost from their toilets as fertilizer for the trees. When their neighbors saw the trees grow big and healthy, they too wanted to try these new toilets that give free fertilizer.
Now almost every family in La Cienega uses these toilets. The local workshop is busy making them, and the community has grown both healthier and wealthier.
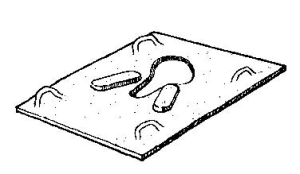
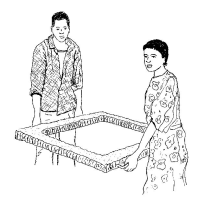
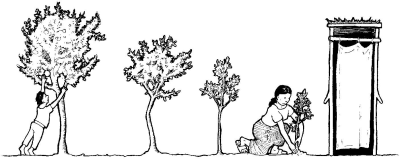
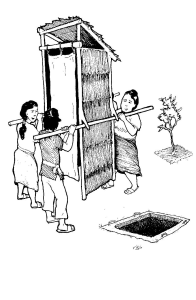
Simple compost toilet for tree planting
This toilet makes fertilizer for planting trees. It is simple to build, and is made so the shelter can be moved when the pit is full.
This toilet is best where there is space and a desire to plant trees. It is also good for places with high groundwater, because the pit is shallow. Covering the toilet pit with soil and planting a tree there helps to decompose the waste.
This is a great way to start an orchard of fruit trees or other useful trees. If you do not plan to plant trees, use a different option.
 |
| Simple compost toilet for tree planting |
| © The Hesparian Sanitation |
To make a simple compost toilet for tree planting
Level the ground and place a concrete ring beam where you want the toilet. Inside the ring beam, dig a pit 1 meter deep, and secure the ring beam in place. Make a platform to put over the pit. Build a light shelter that will be easy to move.
|
To use and maintain this toilet
- Before using, put dry leaves or straw in the pit. This will help feces decompose.
- Add 2 handfuls of soil mixed with ashes or dry leaves after every use.
- When the pile gets too high, stir it down with a stick.
- Sweep and wash the platform often. Be careful not to get much water in the pit.
- When the hole is nearly full, remove the shelter, platform, and ring beam.
- Top up the hole with 30 centimeters of soil mixed with plant matter. After several weeks, the waste will settle. Add more soil and plant matter, water, and plant a tree. Fruit trees grow well and bear safe and abundant fruit.
- Move the shelter, platform, and ring beam. Dig another hole, and do it again.
|
| |
 |
| Moving toilet structure |
|
© The Hesparian Sanitation
|
2 pit compost toilet
The 2 pit compost toilet is like the simple compost toilet for treeplanting, but rather than planting a tree in the pit, the compost is dug out and used in the garden or fields. It is an easy way to turn excrement into fertilizer for almost no cost. Because the waste is mixed with soil in a shallow pit, allowed to dry out and kill germs, and then removed, this toilet tends to be safer for groundwater than traditional pit toilets.
To build a 2 pit compost toilet
Dig 2 pits 1 to 1 ½ meters deep, 1 meter wide, and 30 centimeters apart. Add a lining or ring beam to both pits. Place a platform and a simple shelter over one pit, and a concrete or wood cover over the second pit. Use the first pit until it is nearly full. A family of 6 will fill the pit in about 1 year.
1. When the first pit is almost full, top it up with 30 centimeters of soil and cover it with a board or concrete slab. Move the platform and shelter to the other pit, and use it until it is nearly full. Leave the first pit alone - or, after it has settled for 2 months, add more soil and plant a seasonal vegetable like tomatoes right in the pit. Since the feces are still being processed, it is best to avoid root crops such as carrots and potatoes.
2. When the second pit is full, empty the first pit with a shovel. Wear gloves, and wash hands after handling the fresh fertilizer.
3. Store the contents in bags or buckets for later use, or add them to a compost pile or garden. (To know when the contents are ready. Move the platform and shelter back to the first pit, while the contents of the second pit settle.
To maintain a 2 pit compost toilet
- Keep a bucket of soil mixed with dry plant matter in the shelter. After each use, throw 2 handfuls in the pit.
- When the pile gets too high, stir it down with a stick.
- Sweep and wash the platform often. Be careful not to get much water in the pit.
 |
| After 1 year the contents of the pit compost toilet should be safe to mix into garden soil as fertilizer. Wear gloves and shoes when handling it. |
|
© The Hesparian Sanitation
|
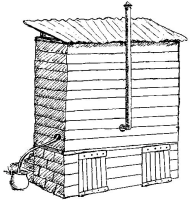
Urine-diverting dry toilets
Dry toilets do not use pits. They are built above ground, so it is easier to remove the contents. They also have a toilet bowl with separate compartments that keep urine and feces apart. This helps the contents of the toilet stay dry, killing germs and reducing smells. This also allows the urine to be used as fertilizer. Because they are built above ground and lined on the bottom, they are safe for groundwater.
Dry toilets are more costly to build than pit toilets. Their safe use requires training, because they are used differently than pit toilets and water-based toilets. And it takes some work to keep them well maintained. But they are very good for people who want to produce fertilizer from their wastes. They are also a good option in places where:
- The groundwater is too high for pit toilets.
- Flooding is common.
- The ground is too hard to dig.
- People want a permanent toilet in or near their house.
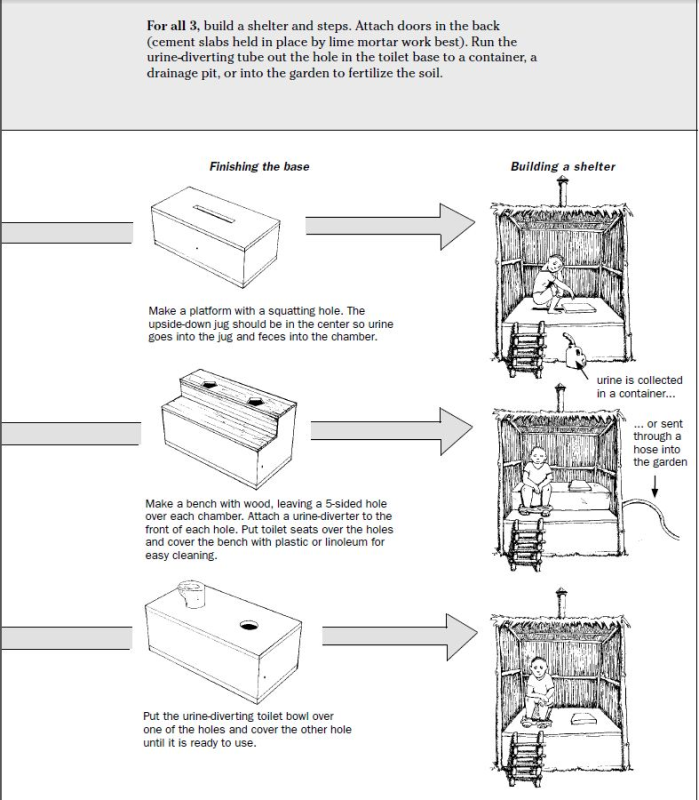
2 chamber dry toilets
This dry toilet has 2 chambers where feces break down into safe fertilizer. One side is used while the feces on the other side dry and break down. A special toilet bowl separates urine into a hose for collection in a container outside of the toilet. After about a year, the dried feces are removed and added to a compost pile or used on fields or gardens. If the urine is collected in a container, it can be mixed with water and used as fertilizer.
 |
| Front of toilet - Parts of the 2 chamber dry toilet |
|
© The Hesparian Sanitation
|
 |
| Back of toilet - Parts of the 2 chamber dry toilet |
|
© The Hesparian Sanitation
|
- Shelter for comfort, privacy, and to keep the toilet dry.
- Urine pot where the urine is collected from the toilet and the urinal.
- 2 chambers made of brick, concrete, or other waterproof material. While one is in use as a toilet, feces dry and decompose in the other.
- One kind of dry toilet uses a toilet bowl that separates urine from feces. The bowl looks very much like any toilet bowl, but it does not use water. Home-made urine catching devices can work just as well
- Small doors at the back where the dried feces can be removed.
- Hose to divert urine from urinal and bowl to urine pot.
- Urinal
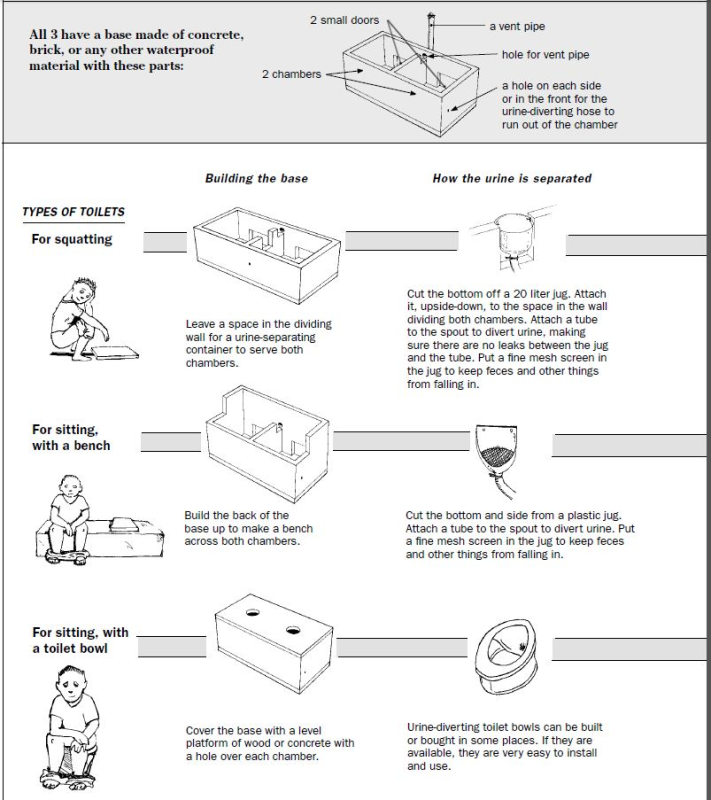 |
| 3 ways to build a dry toilet |
|
© The Hesparian Sanitation
|
 |
| Finishing base and structure of toilet |
|
© The Hesparian Sanitation
|
To use and maintain a 2 chamber dry toilet
 |
| To use and maintain a 2 chamber dry toilet |
|
© The Hesparian Sanitation
|
- The urine-separating device is nailed to the inside of the toilet hole. A screen placed inside the device will keep things from falling into the tube. When the screen is blocked, remove it, clean it, and replace it.
- Keep a pot of mixed soil, ash and dry plant matter in the shelter. After each use, throw 2 handfuls down the dry part of the toilet bowl. Then close the lid.
- Post instructions to help people use and maintain the toilet.
- Keep a pot of water in the shelter. Add a little water to the urinal and the urine separator of the toilet bowl after each use, to control the smell.
- Keep unused chamber covered when not in use.
- Make a urinal from a plastic jug and attach a tube to carry urine to a container or drainage pit.
Make sure no water gets in the toilet chamber.
- If the contents of the toilet get wet, add more dry matter.
- If the toilet smells bad, add more dry matter, and make sure the vent pipe is clear.
- If the pile builds up too high, use a stick to push it back down.
- When the urine pot is full, empty it and make fertilizer.
- When the first chamber is full, use the other chamber. Be sure to cover the first chamber.
- It is best to let the feces sit for a full year before emptying the chamber. After a year, or when the second chamber is full, empty the first chamber and repeat the process.
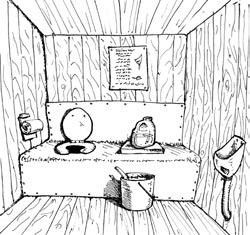
Do not put garbage in the toilet
For ecological toilets to work, they must only be used for excrement. Women having their monthly bleeding may safely use ecological toilets. But sanitary pads and other products should be put in trash bins - not in the toilet. Ecological toilets cannot be used to dispose of things that will not break down, such as cans, bottles, plastic, tampons, or large amounts of paper. They can take small amounts of paper, leaves, sawdust and other plant matter because these things break down and can be turned back into the soil
 |
| Do not throw garbage in the toilet |
|
© The Hesparian Sanitation
|
To know when the solid fertilizer is safe for use
The contents of a dry toilet are ready to remove when they are dry, have little or no smell, and look like ordinary soil. For this to happen, they should be kept dry inside the toilet chamber for 1 year.
When you think the contents should be ready to remove, open the chamber. If the pile is wet, add dry plant matter or soil mixed with ash and let it sit for several weeks more. If the pile is dry and does not have a strong smell, it is ready. Remove it with a shovel.
After drying out for 1 year, most germs will be dead and the material should be safe to handle and to add directly to garden soil. But if there is any doubt, the contents of the toilet can be given extra treatment to ensure that all germs are killed. To completely dry the contents of the toilet, store it in bags or buckets for a few weeks. To heat it up, leave it in a dry, sunny area, or add it to a compost pile.
Since there still may be some germs, it is important to wear gloves and shoes when handling the contents, and to wash well after emptying the toilet.
 |
| Remove dry material for use as fertilizer. |
|
© The Hesparian Sanitation
|
 |
| Always wash after handling human fertilizer. |
|
© The Hesparian Sanitation
|
Urine fertilizer
Some farmers use urine mixed with water as a fertilizer because urine carries valuable nutrients like nitrogen and phosphorous that can help plants grow. Urine is much safer to handle than feces. However, the same nutrients that make it a good fertilizer can pollute water sources. Also, it can carry blood-flukes (schistosomiasis) - common in only some parts of the world. Because of this, it is important not to put urine into water sources, or near where people drink or bathe.
To make simple urine fertilizer
Store urine for a few days in a closed container before use. This will kill any germs it contains, and will also prevent nutrients from escaping into the air. To make fertilizer, dilute the urine with water - mix 3 containers of water for every 1 of urine. (Undiluted, fresh urine is too strong and may damage plants.) You can fertilize plants with diluted urine as often as 3 times a week. Plants fertilized with urine can grow as well as plants grown with chemical fertilizers, and need less water. Plants that make edible leaves, like spinach, grow best. Always wash hands after handling urine.
To make fermented urine fertilizer
Adding compost to urine, and letting this mixture ferment (rot and turn sour), can create new soil for planting.
- 1. Collect urine from dry toilets. For each liter of urine, add 1 tablespoon of rich soil or compost.
- 2. Let the mix sit uncovered for 4 weeks. This will smell bad, so do it in a place away from people. The urine mixture will ferment and turn brown.
- 3. Fill a large container with dry leaves or other dry plant matter. A large container can be made by cutting one face off an old car tire and turning it inside out. Line the container with thick plastic to prevent water leakage through the hole in the bottom.
- 4. Add fermented urine. The best mix is 7 parts plant matter to 1 part urine (about 3 liters of urine for every 30 cubic centimeters of plant matter.)
- 5. Cover with a thin layer of soil - no more than 10 centimeters. Plant seeds or seedlings.
- 6. Water every 2 days with a mix of 1 part urine to 10 parts water. (This is a weaker mix than we suggest above, because it will be used in closed containers rather than open gardens or fields.) The dry plant matter will turn to rich soil in 10 to 12 months.
The new soil can be used as compost or to top up another container.
Improved and adapted dry toilets
The toilets in this book are only some of the options for ecological sanitation. They can be improved and adapted to meet the needs of different communities. Some things that will make a dry toilet work better are:
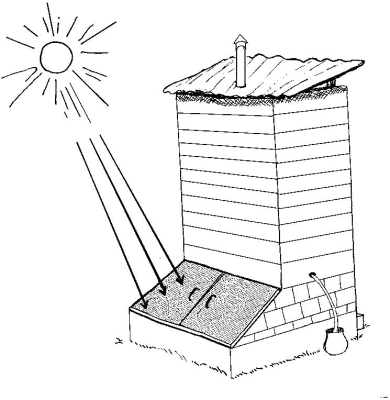
Heat from the sun
Build the toilet so that the chamber doors face the sun, and paint the door panels black. This will make the chambers heat up, improve ventilation, and kill germs faster.
More air flow
Laying bamboo, corn stalks, branches, or other dry plant matter on the floor of the chamber before use will help air flow through the feces for faster drying.
 |
| Improved and adapted dry toilets |
|
© The Hesparian Sanitation
|
 |
| Wash toilet with reed bed |
|
© The Hesparian Sanitation
|
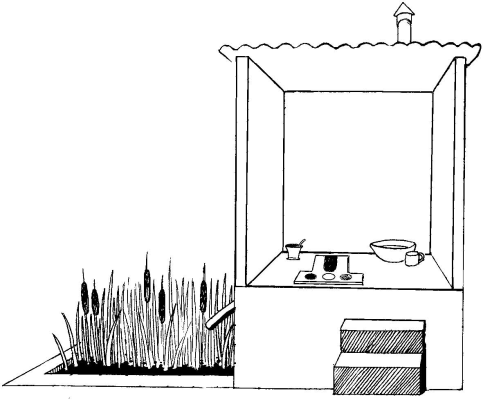
Wash toilet with reed bed
People in India have adapted the dry toilet to let both urine and wash water drain into a bed of reeds.
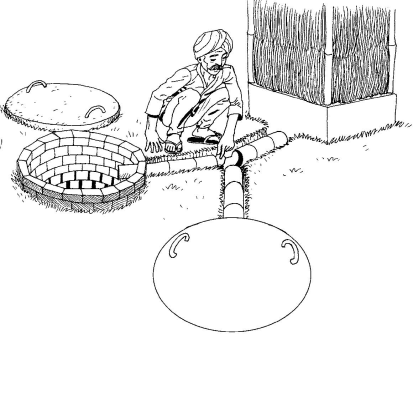
Pour-flush pit toilets
Pour-flush toilets use water to flush waste into a pit. These toilets are common in both urban and rural areas where water is used for anal cleansing. They are not much more costly than pit toilets. Because well-built pour-flush toilets prevent smells, they can be built in or near the home.
Pour-flush toilets use a plastic, fiberglass, or cement bowl or squatting pan set into a concrete platform. The bowl or pan often has a "water-seal trap" that prevents smells and insect breeding in the wet pits. The concrete platform is placed directly over a pit. Or it can be connected by pipe to a pit or 2 pits.
 |
| Water-seal trap set in concrete platform |
|
© The Hesparian Sanitation
|
 |
| 1) Pit pour-flush toilet |
|
© The Hesparian Sanitation
|
|
| 2) Pit pour-flush toilet |
|
© The Hesparian Sanitation
|
How to use a pour-flush toilet
When there is 1 pit, the toilet is used until full, and then it must be emptied before it can continue to be used. When there are 2 pits, there is a valve that directs waste towards the pit in use. The first pit is used until near full. Then waste is diverted into the second pit. Soil is then added to the first pit. Its contents are left to settle for at least 2 years, until it can be emptied without risk of illness from germs. The second pit is used until the first pit is emptied, and then it is allowed to settle as the first pit is used again.
What to know when building a 2 pit pour-flush toilet
Except under very wet conditions or in places with high ground water, it is safe to build pour-flush toilets within 3 meters of wells. In wet soil conditions the toilets should be at least 20 meters from wells.
Pit size for a family of 5 should be 1 meter deep and about 1 meter across. This will allow the toilet to be used for about 3 years before needing to
be emptied.
 |
| What to know when building a 2 pit pour-flush toilet |
|
© The Hesparian Sanitation
|
- Pit shape: The pits can be any shape, but round pits are the least costly and most stable.
- Pit lining should be brick or stone, in cement or lime mortar, with spaces left for liquids to drain out.
- The distance between pits should be at least the same as the depth of the pits. If the pits are 1 meter deep, they should be at least 1 meter apart.
- Pits should be covered with reinforced concrete slabs, stone slabs, or wooden planks. The concrete platform described on page 30, without a hole in the middle, could make a good pit cover.
To use and maintain a pour-flush toilet
Water must be poured in after every use. Pouring a little water in before using will also help keep the pan clean.
Clean the toilet daily. To clean the squatting pan, use detergent powder and a long-handled brush. The pits can overflow if:
- The water seal gets blocked, the toilet will not work.
- The groundwater is less than 3 meters deep, there is a risk of groundwater contamination.
Emptying the pit
After about 3 years of use the first pit will be full. Divert the waste into the second pit, while the first pit rests.
Remove the pit cover, add a layer of soil about 30 centimeters (2 hands-widths) deep, and replace the cover. After 2 years, the contents can be removed with a shovel and used as fertilizer.
Information Source Links
- Sanitation and Cleanliness for a Healthy Environment - The Hesperian Foundation in collaboration with the United Nations Development Programme (2005). The Hesperian Foundation
